


OpenAPI GeneratorsReact App with JavaScript ClientCase 1: Using AxiosCase 2: Using OpenAPI ClientKey Differences:ConclusionAbout AuthorsSai Manasa IvaturiSrinivas vaddi
OpenAPI Generators

Remember? We mentioned that the OpenAPI spec is machine-readable. Now this section shall discuss what that means and how that is a great benefit for the software industry.
OpenAPI spec is machine-readable, which means that it can be used by various tools and frameworks to generate various artifacts for APIs, such as documentation, code, mock servers, test cases, etc. This can save a lot of time and effort in the development process, as well as ensure consistency and quality of the output. Some of the tools and frameworks that can integrate with/generate the artifacts from an OpenAPI document are:
- Swagger UI: A web-based tool that generates interactive documentation for APIs. It allows users to explore and test the APIs using a browser. This is a well-known extension that can be baked into applications across frameworks.
- Swagger Codegen: A command-line tool that generates client and server code for APIs in various languages and frameworks, such as Java, Python, Ruby, Node.js, etc.
- OpenAPI Generator: This is the tool we are interested in for this tutorial series. It is a fork of Swagger Codegen that supports more languages and frameworks, as well as additional features, such as custom templates, post-processing hooks, etc.
- Swagger Editor: An online tool that allows users to create and edit OpenAPI documents in a graphical user interface. It also provides features such as syntax validation, auto-completion, code generation, etc.
- SwaggerHub: A cloud-based platform that provides a collaborative environment for designing, documenting, testing, and generating code for APIs. It also integrates with other tools and services, such as GitHub, AWS, Azure, etc.
Using these tools and frameworks can help create and maintain high-quality APIs with minimal effort. However, there are some potential drawbacks and limitations to using OpenAPI generators. We’ve experienced some of the below challenges when developing a prototype inventory management system. Some of them are:
- They may not support all the features and functionalities of the target language or framework. For example, some generators may not support advanced data types, custom validations, annotations, etc.
- They may not follow the best practices or conventions of the target language or framework. For example, some generators may not use proper naming, formatting, indentation, etc.
- They may not produce optimal or efficient code for the target language or framework. For example, some generators may use unnecessary libraries, dependencies, or boilerplate code.
- They may not be updated or maintained regularly to keep up with the changes in the OpenAPI specification or the target language or framework.
- They may introduce bugs or errors in the generated code that can affect the functionality or performance of the API.
The code generated by the tools is not always perfect or optimal. It may contain errors, bugs, or inefficiencies that can affect the application. Therefore, it is important to review and test the code before using it in the project. The code should also be adapted and improved according to the specific needs and preferences of the developers. Custom templates, post-processing hooks, configuration options, etc. can be used to modify the output of the tools.
React App with JavaScript Client
For the below sections, you can refer to this 📦 GitRepo.
When we work on a front-end project, we often need to write our code to integrate with an API. For example, we might write an
APIHandler.js file that uses Axios to make HTTP requests according to the backend specification. We might use a Swagger file if the API follows the OpenAPI standard, or we might refer to the backend design document to understand the functionality and structure of the API.However, this approach has some challenges that we might not foresee until we build, deploy, or test our code. We might miss some important aspects of the API, such as authentication, headers, error handling, or data validation. We might assume that some of these are not required for internal requests or that they can be mocked or ignored. But this can lead to unexpected errors and bugs in our code.
We also have to consider that this approach can be time-consuming and tedious. We have to write a lot of boilerplate code for each API endpoint and handle different scenarios and edge cases. We have to spend more time debugging and fixing our
Axios requests than improving the front-end features and design. For example, we might waste time just centering the divs.This is where
OpenAPI generators can help us. These are tools that can automatically generate client libraries for various languages and frameworks based on an OpenAPI specification file. An OpenAPI specification file is a file that describes the API in a standard and machine-readable way using YAML or JSON format. By using OpenAPI generators, we can avoid writing any code to make HTTP requests, handle errors, or validate data. We just have to use the generated client library and call its methods with the appropriate arguments.To illustrate this, let’s look at the Todo OAS spec that we built previously, and let’s assume we have a fully functional API and a front-end project that uses it. Alternatively, check out the To-do application here at this git repository.
Case 1: Using Axios
In general, to integrate the front end (react maybe?) with the back end using Axios, need to follow these steps:
- Install Axios in front-end project using npm or yarn.
- Import Axios in front-end code where you want to make API requests.
- Create an Axios instance with the base URL of the back-end API.
- Use the Axios instance to make HTTP requests to the back-end endpoints with the appropriate methods, parameters, headers, and data.
- Handle the response and error from the API requests using promises or async/await.
- Display or update the data in the front-end UI according to the response or error from the API requests.
Also, look at and understand the steps in more detail here.
If we follow the above steps for the To-Do application then our code might look something like below - you can find it here on the repo.
import axios from 'axios';

// Define the base URL for your API
const BASE_URL = 'http://localhost:7787/api';

// Define Axios instances for different endpoints
const todoApiClient = axios.create({
  baseURL: BASE_URL,
});

// Function to get the schema (assuming Todo is an OpenAPI schema) or make API requests
async function getTodoSchemaOrAPI(type, kind, params) {
  console.log('getTodoSchemaOrAPI', type, kind, params);

  if (type === 'schema') {
    return Todo; // Assuming Todo is an OpenAPI schema
  } else if (type === 'api') {
    switch (kind) {
      case 'list':
        try {
          const response = await todoApiClient.get('/todos', { params });
          return response.data;
        } catch (error) {
          throw error;
        }
      case 'create':
        try {
          const response = await todoApiClient.post('/todos', params);
          return response.data;
        } catch (error) {
          throw error;
        }
      case 'update':
        try {
          const { id, ...todoData } = params;
          const response = await todoApiClient.put(`/todos/${id}`, todoData);
          return response.data;
        } catch (error) {
          throw error;
        }
      case 'delete':
        try {
          const response = await todoApiClient.delete(`/todos/${params}`);
          return response.data;
        } catch (error) {
          throw error;
        }
      default:
        return null;
    }
  }
}

export default getTodoSchemaOrAPI;
In this case, Axios is used to make API requests. Let's break down the code:
axios.createis used to create an instance of Axios for the Todo API.
- The
getTodoSchemaOrAPIfunction takes three parameters:type,kind, andparams.
- It checks the
typeto determine if it's a schema request or an API request.
- For API requests (
type === 'API'): - It uses a
switchstatement based on thekindto determine the type of API request (list, create, update, delete). - For each API request, it makes a corresponding Axios request (GET, POST, PUT, DELETE) to the appropriate endpoint and handles both success and error cases using
try-catchblocks. - It throws any errors encountered during the API request.
- It returns the response data if the request is successful.
Case 2: Using OpenAPI Client
With OpenAPI Client, however, things are a bit easy -
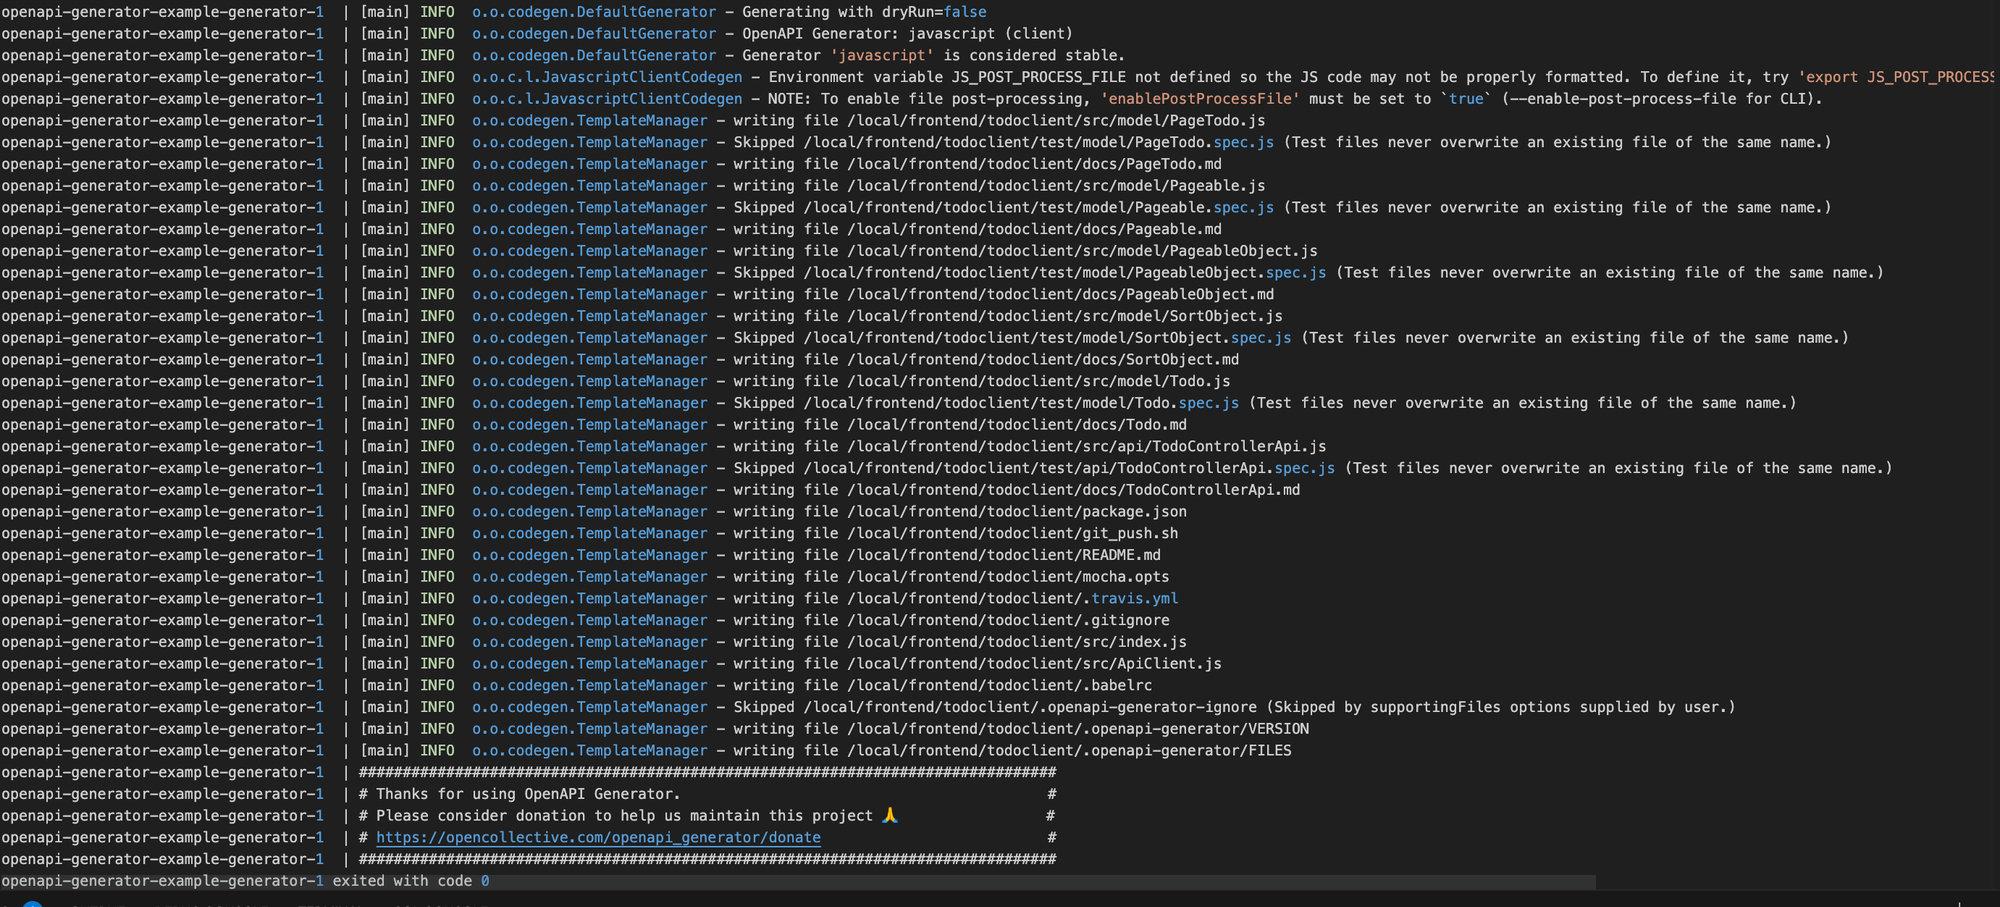
- Install the OpenAPI generator tool in the system using npm or yarn.
- Generate the client library for the desired language and framework using the OpenAPI generator tool and the OpenAPI specification file of your API.
- Import the generated client library in the front-end code where you want to make API requests.
- Create an instance of the ApiClient class and configure it with the base URL and headers of the API.
- Create an instance of the controller class that corresponds to the endpoint want to access and pass the ApiClient instance as an argument.
- Use the methods of the controller instance to make API requests with the appropriate arguments. The methods are named according to the OperationId of the OpenAPI specification file.
- Handle the response and error from the API requests using promises or async/await. The methods of the controller instance return promises that resolve to response objects or reject error objects.
- Display or update the data in the front-end UI according to the response or error from the API requests. You can use various techniques and libraries to manage the data flow between your front-end components and your back-end API.
If we follow the above steps for the OpenAPI-generated Client, we’d end up with a code like this - you can find it here on the repo
import { ApiClient, TodoControllerApi } from 'todoclient';
import { Todo } from 'todoclient';
function getTodoSchemaOrAPI(type, kind, args) {
  console.log('getTodoSchemaOrAPI', type, kind, args);
    if (type === 'schema') {
      return Todo;
    } else if (type === 'api') {
      const apiClient = new ApiClient();
      apiClient.defaultHeaders = {}
      console.log('apiClient', apiClient);
      switch (kind) {
        case 'list':
          return new TodoControllerApi(apiClient).listTodos(args);
        case 'create':
          return new TodoControllerApi(apiClient).createTodo(args);
        case 'update':
          return new TodoControllerApi(apiClient).createTodo(args.object,args.id);
        case 'delete':
          return new TodoControllerApi(apiClient).deleteTodo(args);
        default:
          return null;
      }
    }
  }
export default getTodoSchemaOrAPI;
In this case, an OpenAPI client is used to interact with the API. Let's break down the code:
- The
getTodoSchemaOrAPIfunction still takes three parameters:type,kind, andargs.
- It checks the
typeto determine if it's a schema request or an API request.
- For API requests (
type === 'api'): - It creates an instance of the
ApiClientfrom the generated OpenAPI client library. - It sets default headers if needed.
- It uses a
switchstatement based on thekindto determine the type of API request (list, create, update, delete). - It uses methods provided by the OpenAPI client library (e.g.,
TodoControllerApi) to make API requests. - It returns the API response directly.
Key Differences:
- Code Complexity: Case 2 is generally more concise and cleaner because it relies on auto-generated OpenAPI client methods for making requests. This reduces the need for manual request handling and error checking.
- Type Safety: With the OpenAPI client approach (Case 2) have better type safety because the client library generates TypeScript typings based on your API specification. This can help catch type-related errors during development.
- Default Headers: In Case 2, can easily set default headers for all requests using the
apiClient.defaultHeaders. This simplifies header management.
- Automatic Request Validation: OpenAPI client libraries often perform automatic request validation based on the API specification. This can catch validation errors early in the development process.
- Simpler Endpoint Usage: The OpenAPI client provides methods for each API endpoint, making the code more readable and less error-prone compared to manually constructing URLs.
- Less Error Handling Code: Case 2 has fewer
try-catchblocks for error handling, making the code cleaner. Errors are typically thrown as exceptions, which can be caught at a higher level in application.
In summary, the OpenAPI client approach (Case 2) is generally more advantageous in terms of code simplicity, type safety, and automatic request validation. It reduces the boilerplate code for making API requests and handling errors, allowing developers to focus more on the application's logic and UI.
Conclusion
We have learned what OpenAPI generators are, how they can benefit modern application development, and how they differ from each other. OpenAPI generators can help us speed up development by automating the creation of client libraries, server stubs, documentation, and more based on an OpenAPI specification file.
In the next article, we will see how to use the OpenAPI generator tool to create a client library for our API in various languages and frameworks. Stay tuned!
About Authors
Sai Manasa Ivaturi


I'm a Software Development Engineer based in Atlanta, Georgia with 5+ years of experience in the software industry. My focus area has been Backend development and full-stack development.
View my Resume here.

Masters Degree in Computer Science Indiana University, Bloomington
Jan 22 - May 23

Bachelors Degree in Computer Science Pragati Engineering College, India
Aug 14 - April 18

Srinivas vaddi


Hi! I’m a recent master’s graduate from Indiana University Bloomington (IUB) 🎓 and a Software Development Engineer with 4+ years of experience. Looking for #jobs!
My areas of expertise are Software Development, DevOps, Testing, Integration, Data Engineering and Data Analytics. Mostly worked on Python, Django/Flask, Apache Airflow, Apache Spark, AWS, and DevOps. I have a versatile background & a ‘can do’ attitude 🤓.
I like blogging and sharing knowledge. I’ve built a server at home from scratch! I used it to learn various technologies and to contribute to the open-source. I love tech, philosophy, literature, and history. My favorite books 📚 of all time are ‘The Alchemist’ and ‘Chanakya Neeti’ 🙌.

Masters Degree in Computer Science Indiana University, Bloomington Aug 23, 2021 → Dec 17, 2022
Bachelors Degree in Computer Science Gitam University (Deemed to be) Jun 1, 2014 → Apr 1, 2018